
The gold standard for air sealing
Get your home incredibly air tight with the latest technology. Learn more about how a latex based sealant material with low VOC and no off-gassing can save you hundreds of dollars.

Today Trish and I had the privilege of visiting a home that was getting the deluxe treatment with regards to air sealing. This home was undergoing a beautiful renovation and the homeowner figured if they were paying to have an incredibly well insulated home, it also made sense to have an airtight one too. The homeowner, Mike, was right!
I’ve made the analogy before but it really works so I’ll use it again. Insulation is like the sweater we wear on cold days while the air barrier is like the wind breaker. We need both to stay warm on cold days and so does our house (it also needs a vapour barrier and a weather barrier but those are topics for another day!)
So what does the gold standard of air sealing look like? Called AeroBarrier, the air sealing technology involves pressurizing a house and spraying in an aerosol that contains an acrylic compound. The material enters the home as a vapour and since the home is pressurized it’s pushed to the outer edges of the home. If it finds a spot to latch onto it will. If not, it’ll keep moving around until it does. A home the size of Mike’s took about three hours and one bucket of product to seal.
The results were amazing. A 50% improvement in air leakage, with air tightness that’s comparable to a new home. The homeowner will see results in reduced energy bills (an estimated savings of $300 - $400/year) and incredible comfort. Also the side benefits of lower air leaks means less noise, dust and unwanted creatures will enter the home.
Stay tuned for our next blog post where I will share the details on how this technology can also help you with leaky ductwork!
If you’d like to nerd out on this really interesting technology you can learn more here.

The crew supervises the installation which took 3 hours.

DIY Air Sealing
I want everyone to know that you don’t always have to spend thousands of dollars to reduce your home’s emissions. Up to 40% of home’s heating is lost to air leaks. Air Sealing is something you can (and should) do right now.
Sometimes I get so frustrated by the things I can’t control that I need to channel my energy towards things I can do something about.
I’ve had air sealing on the list for the last few weeks (ever since I audited my home as a part of my energy advisor training). A few weeks ago I tackled it. I want everyone to know that you don’t always have to spend thousands of dollars to reduce your home’s emissions. Up to 40% of home’s heating is lost to air leaks. Air Sealing is something you can (and should) do right now.
First a few words of caution - you should always wear protective equipment. A mask and gloves are advised, especially when working with spray foam.
Second - Do your research and take the time to understand how air, heat and moisture flow through your home before you start running around and sealing up every nook and cranny. If you seal things without understanding how your home works you may, at worst, create problems with moisture and airflow and at best may spend a lot of time and money without really moving the needle on your air leakage. When in doubt ask a professional!
An excellent resource is one from Natural Resources Canada called ‘Keeping the Heat In’. If you don’t have time to read it all, just read the section on air leakage.
Why do small cracks cause a lot of heat loss? Two things need to be present for heat to be lost through air leakage. First, there needs to be cracks or spots where air can leak out. This may be obvious but it’s helpful to think about why they exist and where they may have come from. Most newer homes have an air barrier, for the wall portion of our homes this is most often house wrap. For it to be effective it needs to be continuous. Think of it similar to those stylish fanny pack windbreakers we all owned in the 80s.


When someone installs new pot lights in the ceilings, or gets a new air conditioner installed, these are more holes in our home’s K-Way Wind Breaker (or air barrier for the more technical folks reading this). If the installer doesn’t take time to seal this penetration properly, it may be a likely culprit for air leakage.
I mentioned that two things need to be present for heat loss by air leakage. The second is a pressure difference. Our homes are naturally depressurized relative to the outside. Wind blowing on one side will naturally depressurize a home. Anytime we run an exhaust fan we are depressurizing our home (think of it like drinking from a plastic bottle without pausing to let air go into the bottle). The most common cause of depressurization comes in the winter. Hot air is lighter and so will rise and when it does it finds nice little leaks for it to flow through (like through those pot lights in the ceiling of our top floor). Then to make up for the air that was lost, cold outdoor air will come in through the basement, mix with the indoor air and the cycle continues.
Your home may be a good candidate for DIY Air Sealing if:
You’ve had an energy audit and received a list of air leakage locations from the auditor.
You’ve done your research and understand the stack effect
You consider yourself somewhat handy

Common Sources for Air Leakage Source: Keeping the Heat In, NRCan
Okay now that the science lesson is done, onto the fun part. Doing the work! First, head to your local hardware store. Pick up a few cans of spray foam, some indoor/outdoor caulk (think about where you’ll be using it and what colour you’d like), some foam gaskets for your outlets and weather stripping for those drafty doors.
Start outdoors and examine all the spots where something goes from the outdoors to indoors - an exhaust fan, the internet cable, your power, exhaust from your furnace, to name a few. Check how well sealed they are and top up if necessary.
Then head indoors. If you have an attic, you’ll want to start there and first look at your hatch. Does it have weather stripping and a latch? Then into your attic we go! For every pot light and other penetration into the attic, check how well sealed they are. Spray foam works well in attics because no one will see it and it does an excellent job. A word of advice on spray foam - if it gets on your clothes or anywhere you don’t want it to go, don’t try and wipe it up. It’ll only make things worse. Wait until it dries and then it’ll crack off (although for clothes you’ll never be able to get all of it off). Gloves are also a really good idea when using spray foam.
Then head to your basement. If your basement is unfinished, seal up the spot where your basement wall meets your main floor subfloor (these are your headers and they are often a culprit for intake air). Sometimes, you might find it helps to shove some insulation between the headers first and then seal around the insulation to both hold it in place and to make sure you don’t end up using an entire $20 can of spray foam on one little area.
Last, tackle any doors or windows that you know are leaky with weather stripping and caulk as relevant.
Good luck and if you’ve had an audit done, you may now qualify for the air sealing rebate currently on offer from Enbridge (you need to do two things on your home to qualify).
I’m always happy to provide 10 minutes of free advice or support to anyone who is interested in air sealing so please don’t hesitate to contact me at sgrant@goldfinchenergy.ca.

My home office is not comfortable
As the temperatures have dipped below zero recently, you’ll often find me working with a blanket wrapped around me and a hot cup of tea on the desk. Sometimes I even don a hat.
Since the pandemic hit my partner and I have been, like many Canadians with desk jobs, working from home (okay I don’t always work from home and love the days when I am outside measuring other’s homes and talking with you about your comfort issues). Today, I want to share a bit about my home office and the steps I am taking to make it more comfortable.
A caveat: calling the space an office is quite a generous term. We are in a 3 bedroom semi and with 3 kids, the office is also the master bedroom. But during the day, it serves as an office so hereonin I will refer to it as my home office.
As the temperatures have dipped below zero recently, you’ll often find me working with a blanket wrapped around me and a hot cup of tea on the desk. Sometimes I even don a hat.

Many of us (myself included) would have tried cranking the thermostat or even speculated that our furnace was not sized big enough. Now that I’m an energy advisor, I know that more often than not the path to comfort involves insulation and air sealing rather than upsizing a fossil burning piece of mechanical equipment that has a lifespan of 10 years (although there are times when a heating system is not sized properly and as an energy advisor I am also trained to check this too!)
So what’s the plan? First up, our ducts. This is an area that energy advisors, home inespectors and even HVAC installers don’t typically look at. But I know that my ducts are leaky as the air coming into one of the other bedrooms on the second floor is much more forceful than what is entering my home office. This was confirmed when I brought in Victor. Victor is with Aeroseal Tech. With a free home quote, he confirmed my suspicions, the air flow to my home office is half of what I’m getting from other vents. He was able to determine that at least 30% of my heat wasn’t making it to where it should. Meaning, my ducts are leaky and the heat, rather than getting pushed upstairs, is getting lost in the basement (where we don’t really need it) and in the walls where it slowly dissipates out. You may not think that this is a problem as the heat makes it upstairs eventually (temperature differences like many things in life naturally seek to balance out, I’ll save the physics lessson for later). But the problem is actually two-fold. Not enough hot air is getting to my home office and what little that does get there is leaking out of my home too quickly making that room constantly 2-3 degrees colder that what I’d like.
That brings me to the next section. You might be wondering why this room alone has issues. Part of it is because of leaky ductwork but the other part is because a good portion of the walls are exposed and poorly insulated. The ceiling is above a small attic that most definitely does not (yet!) have any insulation in it. The front wall also does not (yet!) have any insulation. A third of the floor is actually exposed (it hangs over our porch) and it too is not insulated (yet!). So there are both A LOT of exposed walls in this room and most of them are poorly insulated. The only side that is exposed and insulated is the right which has 2” of continuous insulation underneath the siding (we added this when we redid the siding). By putting my hand on the decently insulated and the poorly insulated walls I can feel an extreme temperature difference.

So the plan involves fixing my leaky ductwork and insulating the exposed walls. Two of the three exposed walls have framing and I plan to have cellulose blown inbetween the studs. Then, when we can take on a bigger project, we’ll add more insulation at the same as time when we redo the roof and the siding on the front of the house.
As far as insulating walls goes, blowing in cellulose between the studs is a relatively uninvasive low-cost approach. A insulating company will drill 2” holes between the studs, fill them with insulation, and patch over the walls leaving me with warm comfy walls and only a few spots that need to be painted over. We’re timing this work so that it’s done before we need to repaint.
I’ve started getting quotes on the insulation work and have the duct sealing scheduled for next Wednesday. I am SOOO looking forward to a more comfortable office in 2021! I promise to keep you posted on my home comfort adventures. If you have a problem with an uncomfortable home office, I’d love to chat and see if we can help!

Barbara: Getting Off Gas in The Danforth
Barbara lives in a beautiful 2 ½ story home just north of Danforth Avenue in Toronto. A lawyer by trade, she also has one son and one nephew, both of whom were constantly reminding her about the climate crisis and how awful natural gas is.
Barbara lives in a beautiful 2 ½ story home just north of Danforth Avenue in Toronto. A lawyer by trade, she also has one son and one nephew, both of whom were constantly reminding her about the climate crisis and how awful natural gas is.
Three years ago she decided she needed to do something (if only to keep her son & nephew quiet!) and started figuring out what to do. It wasn’t easy, a lot of HVAC companies predominately install gas furnaces and many tried to dissuade her from making the switch from a gas furnace to heat pumps. However, Barbara persisted and is glad she did as she’s discovered that heat pumps are a really versatile and cost-effective way to heat (and cool) a home.

I recently visited Barbara’s home (while wearing a mask) to learn more about her fuelswitching experience.
Before fuel switching from a gas furnace to electric heat pumps, Barbara also wanted to understand her home’s overall efficiency so she hired an energy advisor. The advisor visited her home, ran some tests and provided her with an EnerGuide (an energy audit program run by NRCan) to guide some efficiency upgrades. Although people tend to think of replacing windows to reduce heat loss, Barbara had some wise advice to look at her walls instead. If you replace glass windows, sure you end up with less leaky windows, but they’re still glass openings. If you instead think about insulating your walls, it’s like adding a cozy thermal blanket around your home. To improve her home’s thermal envelope, she removed some of the old walls and built new framed walls that could be insulated behind the drywall. Barbara also installed a new, airtight front door.
Although heat pumps can be centrally ducted, just like furnaces, Barbara’s home warranted a different approach. To free up precious ceiling space in her basement (that was being taken up by her ductwork) she went with “ductless” technology which places indoor units in various rooms of the home. Ductless systems are incredibly advantageous because each indoor unit has its own remote thermostat. For Barbara’s home, with four adults living on four different floors, this means no fighting about the temperature. Everyone gets the freedom to set their heat pump to the temperature they like, ensuring perfect comfort in each room, year round.
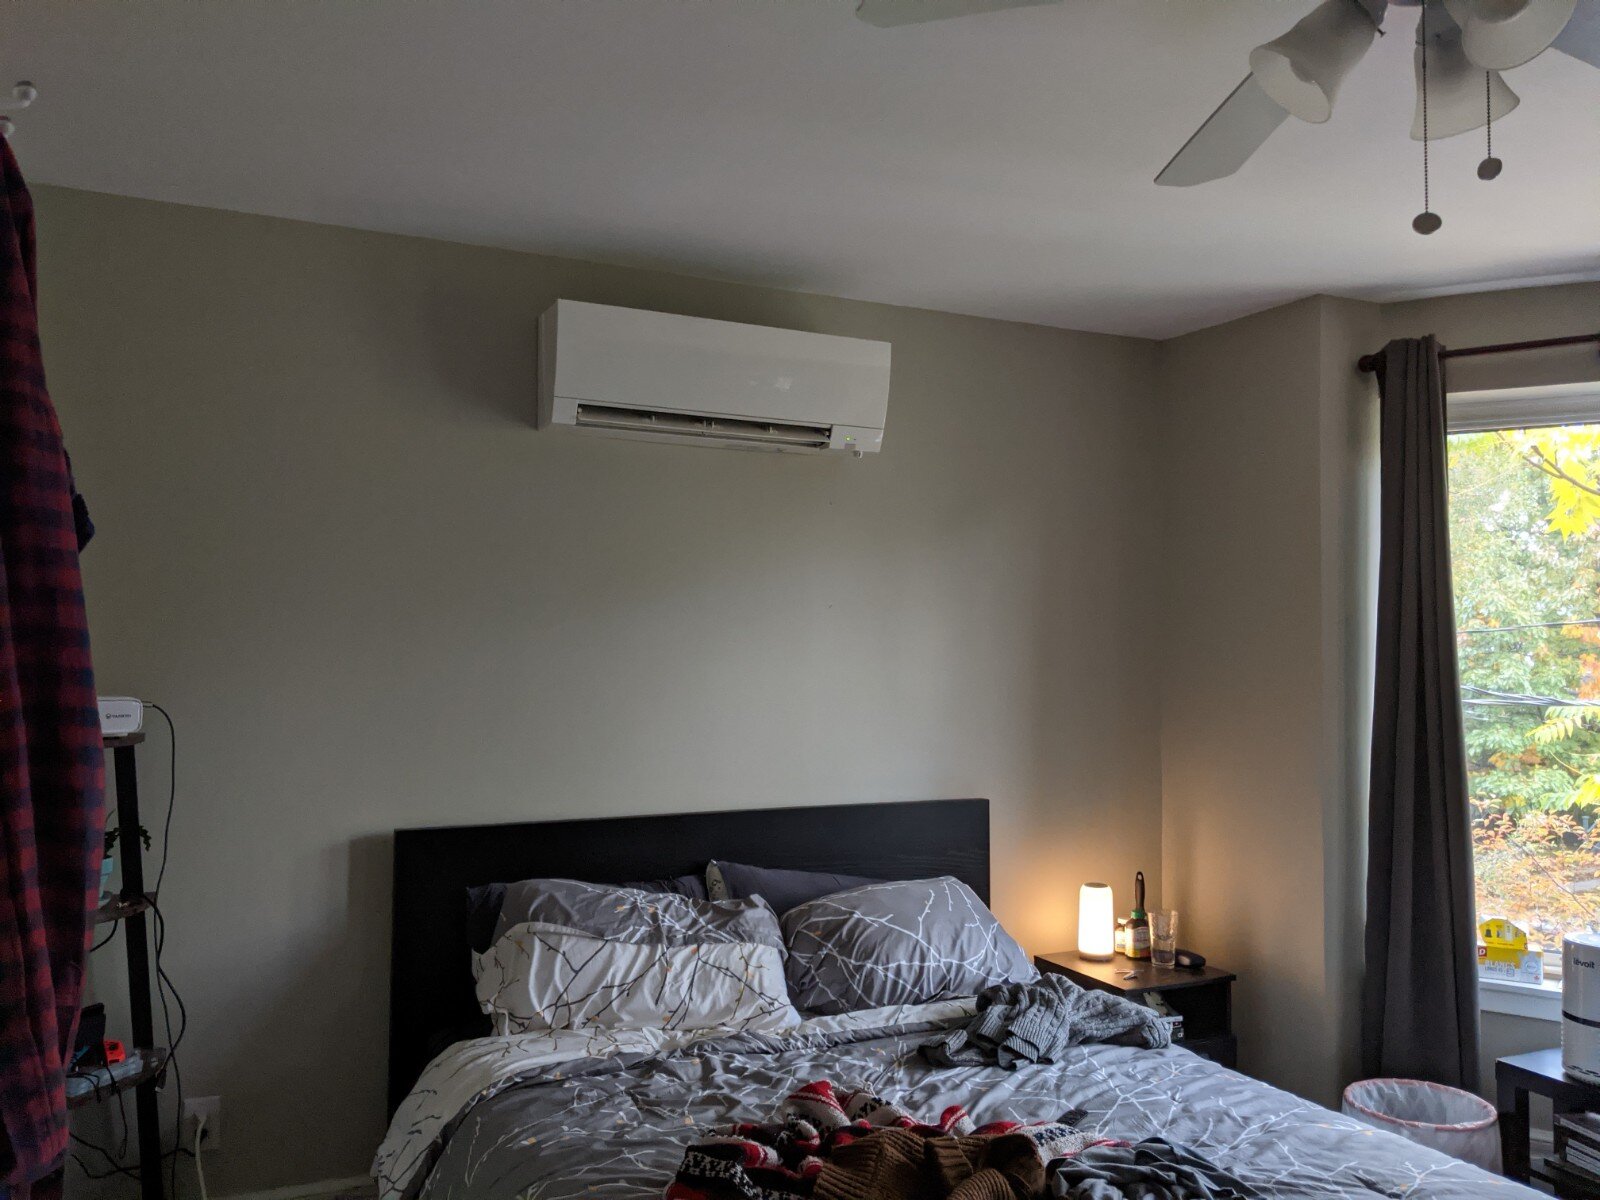

Shown on the left is one of the indoor units and to the right is one of the outdoor units. Electrical, controls and refrigerant are all run via cables between the indoor and outdoor units. Finding the right HVAC installer is important as the location of both outdoor and indoor units is critical.

The baseboard heating in Barbara’s bathroom.
As an early adopter, Barbara wanted some back-up heat just in case (the city also required it for her basement apartment). Barbara purchased some electric baseboard heaters from her local hardware store for $60. Even though the baseboards are there, she and her roommates have found that the heat pumps provide more than enough heating even during the coldest days in winter.
As for the bills? Barbara’s costs have gone down. Thanks to her insulation strategy, Barbara saves about $100 a month, uses a quarter of the gas (she still uses gas for her hot water and stove) and is far more comfortable. Best of all, her son and nephew are proud of her for slashing her home’s emissions.
Goldfinch Energy keeps finding that smart home retrofits like Barbara’s go hand-in-hand with improved overall comfort. Contact Goldfinch for expert advice on a heat pump configuration that makes sense for you and your home.